Sarah Mitchell
Operations Manager
Flooring Installation Timeline: What to Expect Day by Day
The days leading up to a flooring installation are stressful for most homeowners. You have spent weeks picking the right material, comparing quotes, and rearranging your life around a construction schedule. Now the start date is approaching and you are wondering what actually happens once our crew shows up at your door.
We get it. After completing more than 4,000+ flooring projects across Pennsylvania and New Jersey since 2003, we have seen every version of installation-day anxiety. The homeowner who calls three times the day before. The couple who cannot sleep because they are worried about dust on the baby's things. The retired teacher who rearranged her entire house and then asked if she did it right.
Here is the truth: a well-run flooring installation is boring. It is predictable. It follows a clear sequence of steps that our 35+professionals have repeated thousands of times. And when you know what to expect at each stage, the anxiety drops significantly.
This guide walks you through the entire process from the moment you sign the contract to the day you move your furniture back in. We will cover what happens behind the scenes, what you will see each day, and how timelines differ depending on whether you are getting hardwood, luxury vinyl plank, tile, or carpet. No surprises. No vague promises. Just a clear picture of what your week is going to look like.
Before Day One: What Happens After You Sign the Contract
Most homeowners think the process starts when the installation crew walks through the door. It actually starts days or even weeks before that, and most of the work happens on our side where you do not see it.
Once your contract is signed and your deposit is processed, our operations team kicks into gear. Sarah Mitchell, our operations manager, coordinates every project from start to finish. She is the one making sure your materials get ordered from the right distributor, your installation crew is scheduled, and all the logistics line up so that day one goes smoothly.
Here is what happens in that window between signing and install day:
- Material ordering: We place your material order immediately after contract signing. Depending on the product, lead times range from a few days to several weeks. Custom-order hardwood species or specialty tile patterns can take longer. Sarah will give you a delivery estimate so you can plan accordingly.
- Crew scheduling: We match your project with the right installation team. A complex herringbone hardwood job goes to our most experienced wood crew. A straightforward LVP install in a ranch home might go to a different team. We do not just send whoever is available — we match skill sets to project requirements.
- Pre-install communication: You will receive a call or email confirming your start date, the estimated timeline, and a checklist of what you need to do before we arrive. This is not optional reading — it is the difference between a smooth install and a delayed one.
- Subfloor assessment notes: If our estimator flagged any concerns during the initial measurement visit — squeaky spots, uneven areas, potential moisture issues — those notes go to the installation crew so they know what to watch for on day one.
During this waiting period, you should be doing your own prep work. Our guide to preparing your home for flooring installation covers everything in detail, but the short version is: clear the rooms, empty the closets, arrange for pets and kids to be elsewhere, and keep your HVAC running at normal temperatures.
Material Delivery and Acclimation (3–7 Days Before)
This is the phase that trips up the most homeowners. Your flooring material arrives, and the natural instinct is to want it installed immediately. But depending on what you ordered, that material needs to sit in your home and acclimate to your environment before a single plank goes down.
Acclimation is not optional. It is not something we made up to delay your project. It is a requirement from virtually every flooring manufacturer, and skipping it causes real problems — gaps between planks, buckling, cupping, and click-lock joints that pop apart months after installation.
Here is how acclimation timelines break down by material:
- Solid hardwood: 3 to 5 days minimum, sometimes up to 7 days depending on the species, plank width, and how different the storage environment was from your home. Wide-plank white oak from a cold warehouse in January needs more time than narrow red oak delivered in temperate weather. We use a moisture meter to verify the wood has reached equilibrium with your home before we start.
- Engineered hardwood: 48 to 72 hours in most cases. Engineered products are more dimensionally stable than solid wood because of their plywood or HDF core, but they still need time to adjust.
- Luxury vinyl plank (LVP): 48 hours is standard. LVP is very stable, but extreme temperature differences between the delivery truck and your living room can cause the planks to be slightly contracted or expanded. Let them settle.
- Laminate: 48 hours, with unopened boxes laid flat in the room where they will be installed. Some manufacturers require the boxes to remain sealed during acclimation — check the paperwork or ask us.
- Tile: No acclimation needed. Porcelain and ceramic tile are inert materials that do not expand or contract with humidity changes. This is one of the reasons tile is popular in bathrooms and kitchens. You can deliver tile the day before install with no issues.
- Carpet: No formal acclimation period, though we recommend having it delivered at least 24 hours early so it can unroll and relax from being stored in rolls. This helps it lay flat faster during installation.
When the material arrives, we coordinate delivery directly to your home. The boxes should be spread out in the rooms where they will be installed — not stacked in the garage, not left on the front porch, and definitely not stored in an unheated basement. The whole point of acclimation is to let the material reach the same temperature and humidity as the space where it will live permanently.
We had a project in Easton where the homeowner stored twelve boxes of solid white oak in their detached garage through a cold snap. The wood was sitting at 38 degrees when we arrived. We had to delay the install by five days while the planks slowly came up to room temperature and their moisture content stabilized. Five days of waiting that could have been avoided with better planning. Sarah called the homeowner ahead of delivery to explain the process, but the garage seemed more convenient than clearing space in the living room. Convenience cost them almost a week.
Day One: Prep, Demolition, and Subfloor Work
This is the day that feels the most chaotic. Our crew shows up — typically between 7:30 and 8:30 AM — with a trailer full of tools, saws, and equipment. They are going to transform your home over the next several days, and day one is where all the unglamorous but essential work happens.
Morning: Setup and protection. The first thing our crew does is protect the areas of your home that are not being worked on. We lay down heavy-duty drop cloths or ram board on hallways and stairs that we will be walking through. If you have rooms adjacent to the work zone that are keeping their existing flooring, we tape off doorways and may hang plastic dust barriers to contain sawdust. This is especially important for hardwood and tile installations, where cutting generates significant dust.
We set up our cutting station — usually in the garage, on the driveway, or on a covered patio. Miter saws and table saws stay outside the living space whenever possible to minimize dust inside. If weather or layout forces us indoors, we set up in the room farthest from occupied spaces and use dust collection systems.
Demolition of existing flooring. If you have old flooring coming out, this is when it happens. The timeline for demo varies dramatically depending on what is coming up:
- Old carpet: The fastest removal. A typical room takes 30 to 60 minutes to pull up carpet and pad, remove tack strips, and pull staples from the subfloor. A whole house might take half a day.
- Floating LVP or laminate: Usually quick — one to two hours per room. The planks come apart and stack up for disposal.
- Glue-down hardwood or vinyl: This is where things slow down. Scraping old adhesive from a subfloor is tedious, backbreaking work. Depending on the adhesive type and how well it bonded, a single room can take several hours.
- Ceramic or porcelain tile: The hardest demo. Tile comes up in pieces, the mortar underneath needs to be chiseled or ground down, and the whole process is loud, dusty, and time-consuming. A kitchen floor of old tile can eat up an entire day.
Subfloor inspection and repair. This is the moment of truth that you cannot predict from above. Once the old flooring is out, our crew inspects every square foot of the subfloor. They are looking for:
- Squeaky spots (usually fixed with screws driven into the joists)
- Soft spots or rot from old water damage
- Uneven areas that need leveling compound
- Moisture readings that are too high
- Old adhesive residue that needs to be scraped or ground smooth
If we find subfloor damage, we call you immediately. We explain what we found, show you photos, give you a cost for the repair, and wait for your approval before proceeding. We never just cover up a problem. That might save time today, but it creates a much bigger headache six months from now.
Owner Vincent Karaca has a rule on this that every crew follows: if the subfloor is not right, we stop and fix it before a single plank goes down. No exceptions. It does not matter if it pushes the timeline. A floor is only as good as what is underneath it.
End of day one. Before our crew leaves for the day, they clean up. Debris goes into our trailer or into bags staged for pickup. Tools are organized. Dust barriers are checked. We do not leave your home looking like a demolition site overnight. You should be able to walk through safely, use your kitchen and bathrooms, and sleep without worrying about nails on the floor.
Days 2–3: Installation Begins
This is the part you have been waiting for. The old floor is gone, the subfloor is prepped and level, and our crew starts laying your new material. This is when your home starts looking like you imagined it when you picked that sample at our showroom.
The installation process varies significantly depending on the material, and understanding the differences helps you set realistic expectations for how quickly your project will move.
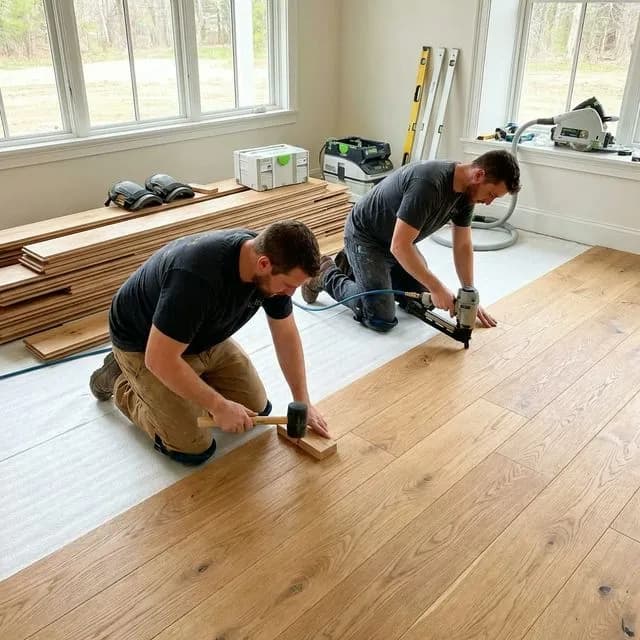
Hardwood Installation (Days 2–3 and Beyond)
Hardwood flooring installation is the most labor-intensive and detail-oriented of all flooring types. Whether it is nail-down solid hardwood or glue-down engineered planks, each board is individually placed, and the installer is constantly checking alignment, spacing, and fit.
For a nail-down installation, our crew uses a pneumatic floor nailer that drives cleats through the tongue of each plank at a precise angle. The first few rows are the slowest because they set the alignment for the entire floor. Once the pattern is established, the pace picks up. An experienced two-person hardwood crew can typically install 300 to 500 square feet per day depending on the plank size, room layout, and how many cuts are needed around obstacles.
Glue-down installations add drying time. The adhesive needs to be troweled onto the subfloor in sections, and the planks must be set before the adhesive skins over. This is precise, time-sensitive work. At the end of each day, the newly installed sections need to sit undisturbed overnight while the adhesive grabs.
If you opted for a pattern layout — herringbone, chevron, or diagonal — expect the installation to take 30 to 50 percent longer than a standard straight lay. Every plank requires more cuts, more measuring, and more dry-fitting before it goes down permanently.
Luxury Vinyl Plank Installation (Days 2–3)
LVP is one of the faster materials to install, which is one of the reasons it has become so popular. Most LVP uses a click-lock system — no nails, no glue, no drying time. The planks snap together, and the entire floor floats over the subfloor with an underlayment pad underneath.
A skilled LVP crew can cover 500 to 800 square feet per day in a straightforward layout. Open-concept rooms with few obstacles go even faster. Rooms with lots of angles, closets, doorways, and transitions slow things down because every cut has to be precise — LVP does not hide mistakes the way carpet does.
One advantage of LVP that homeowners love: you can walk on it immediately after installation. There is no curing time, no waiting, no tiptoeing around. Once the last plank clicks into place and the trim is on, the floor is ready for use.
Tile Installation (Days 2–4+)
Tile is the slowest flooring to install, and it is not even close. There are multiple stages, and each one requires waiting time before the next can begin.
Day two for a tile project typically starts with setting the layout. Our crew dry-fits tiles to establish the pattern, determines where cuts will fall, and ensures the grout lines are even and symmetrical. Then they begin spreading thin-set mortar and placing tiles, using spacers to maintain consistent grout joints. A tile crew can set approximately 100 to 200 square feet per day depending on tile size — large-format tiles (24 by 24 inches or bigger) cover ground faster but are heavier and require more skill to keep level.
After the tile is set, the mortar needs 24 hours to cure before anyone walks on it. Then comes grouting, which is typically day three or four. After grouting, the grout needs another 24 to 48 hours before the floor can handle regular foot traffic. If the tile is in a wet area like a bathroom or laundry room, sealing the grout adds another step.
Carpet Installation (Often Same Day)
Carpet is the speed champion of flooring installation. A single bedroom can be carpeted in an hour or two. A full house might take one to two days. The process is straightforward: tack strips go around the perimeter, the pad is rolled out and stapled, the carpet is cut to size, stretched with a power stretcher, and tucked into the tack strips. Seaming between rolls requires a seaming iron and is the most skill-dependent part of the job.
For many carpet projects, our crew completes both removal of old flooring and installation of new carpet in the same day. You might wake up with old worn-out carpet and go to bed with plush new flooring under your feet. That kind of turnaround is not possible with any other material.
Throughout the installation days, communication is ongoing. If the crew encounters anything unexpected — a vent that needs to be relocated, a door that needs trimming to clear the new floor height, a transition that requires a custom solution — they either handle it on the spot or contact Sarah to coordinate with you. You are never left wondering what is happening in your house.
Final Day: Finishing, Trim, and Walkthrough
The last day of any flooring project is the most detail-oriented. The big dramatic work is done — your new floor is down, and the room already looks transformed. But the finishing details are what separate a professional installation from a mediocre one.
Trim and transitions. Baseboards go back on — either the originals that were removed before installation or new ones if you opted for replacements. Each piece is measured, cut to fit, and nailed into place. Inside corners get coped joints, outside corners get miter cuts. If quarter-round or shoe molding is being added, that goes on after the baseboards.
Transition strips between rooms get installed. These are the metal or wood pieces that bridge the gap between your new floor and adjacent surfaces — the hallway meeting the bathroom tile, the living room meeting the kitchen vinyl, the bedroom meeting the carpeted stairs. Every transition needs to look intentional and sit flush. Sloppy transitions are the most visible sign of a rushed job.
Door undercutting. If your new floor is taller than the old one — which it usually is when going from carpet to hardwood or LVP — interior doors may need to be trimmed at the bottom so they swing freely. Our crew uses a jamb saw to undercut door casings and an oscillating tool to trim the bottoms of doors. This is fussy work that takes time, but it makes the floor look like it was always there.
Vent covers and floor registers. These get reinstalled and adjusted to sit flush with the new floor surface. If the old registers do not fit with the new floor height, we will let you know so you can order replacements.
Final cleanup. Once all the trim and detail work is done, our crew does a thorough cleanup. The new floor gets swept and vacuumed. For hardwood and LVP, we do a damp mop with an appropriate cleaner. All construction debris, scrap material, old flooring, and packaging goes into our trailer for disposal. Dust barriers come down. Drop cloths come up. Your home should feel like a home again, not a construction zone.
The Final Walkthrough
This is the most important part of the last day, and we take it seriously. A crew lead walks through the entire project with you, room by room, and you inspect everything together. Here is what you should be looking at:
- Overall appearance — does the floor look the way you expected? Are the color and grain pattern consistent with the sample you approved?
- Seams and joints — are planks tight against each other with no visible gaps?
- Transitions — do they sit flush and look intentional?
- Baseboards and trim — are they tight against the wall and the floor with no visible gaps?
- Undercut door casings — do doors open and close freely?
- Floor registers and vents — are they seated properly?
- Edges and corners — are the cuts clean and tight, especially in closets and around obstacles?
- Squeaks — walk the entire floor and listen for any squeaking or movement
- Cleanup — is the space clean and free of debris, dust, and packaging?
If anything is not right, say so during the walkthrough. Our crew would rather fix a small issue on the spot than come back next week. A loose transition strip takes two minutes to secure. A baseboard that does not sit tight needs one more nail. These are easy fixes when the crew is still there with their tools. They become callbacks and scheduling headaches later.
We encourage you to take your time during the walkthrough. Get down on your knees and look at the floor from a low angle. Open and close every door. Walk into every closet. Check behind every door. This is your chance to catch anything before the crew packs up. Do not feel rushed and do not feel awkward about pointing things out — our installers want you to be happy with the finished product.
After Installation: Curing Times and When to Move Furniture Back
The installation is done, the crew has packed up, and your new floors look incredible. But the project is not quite finished. Depending on your material, there are curing times and post-install protocols that you need to follow to protect your investment.
Curing Times by Material
Nail-down hardwood (prefinished): You can walk on it with clean socks or soft-soled shoes immediately. Wait 24 hours before placing area rugs. Wait 48 to 72 hours before moving furniture back. Use felt pads under every furniture leg — no exceptions.
Glue-down hardwood or engineered: Stay off the floor for 24 hours after installation. Light foot traffic after 24 hours. Wait 48 to 72 hours before moving furniture. The adhesive needs time to fully cure, and weight on the floor too soon can cause planks to shift.
Site-finished hardwood: If your hardwood was sanded and finished on site with polyurethane, this requires the longest wait. Oil-based polyurethane needs 24 hours between coats, and the final coat needs 48 to 72 hours before light foot traffic. Full cure takes 7 to 14 days — during that time, do not place rugs, do not wear shoes on the floor, and keep pets off. Water-based polyurethane cures faster, with light traffic possible after 24 hours and full cure in 3 to 5 days.
Luxury vinyl plank: Walk on it immediately. Move furniture back after 24 hours. There is no curing time for floating LVP floors — the floor is fully functional the moment the last plank clicks in. This is one of the biggest practical advantages of LVP over hardwood.
Laminate: Same as LVP — walk on it right away, move furniture back after 24 hours. The floor is ready to use immediately.
Tile:Do not walk on freshly set tile for 24 hours while the mortar cures. After grouting, wait another 24 to 48 hours before regular foot traffic. Full grout cure takes up to 28 days, but the floor is functional for daily use after 48 hours post-grout. If the grout was sealed, follow the sealer manufacturer's recommendations for cure time.
Carpet: Walk on it immediately. Move furniture back right away — just use furniture coasters or wide pads under heavy pieces to prevent crushing the padding. Vacuum the new carpet within 24 hours to pick up loose fibers from manufacturing (this is normal and not a defect).
Moving Furniture Back the Right Way
This is where homeowners damage brand new floors. You have waited days for this beautiful floor, and then you drag a couch across it and leave a six-foot scratch within the first hour. We see it more often than we would like.
- Never drag furniture across any hard-surface floor. Lift and place. If it is too heavy to lift, use furniture sliders (felt pads or plastic discs designed for moving heavy items).
- Install felt pads on every furniture leg before it touches the new floor. Chairs, tables, sofas, beds, bookshelves — all of them. The adhesive-backed felt pads from any hardware store work fine. Replace them every six months because they collect grit.
- Use plywood sheets or Masonite boards as a ramp when rolling heavy items (refrigerators, appliances, heavy dressers) back into position. The concentrated weight of wheels or narrow legs on a new floor can dent hardwood and crease LVP.
- Wait the recommended time. We know you are eager to get your house back together. But placing a 200-pound bookshelf on a glue-down floor that has not cured will cause the planks underneath to shift permanently.
What Can Go Wrong (And How We Handle It)
We are not going to pretend every installation goes perfectly. After4,000+ projects, we have seen our share of surprises. The difference between a good flooring company and a bad one is not whether problems happen — it is how they get handled when they do.
Here are the most common issues that come up during installation and exactly how we deal with them:
Subfloor damage discovered during demo. This is the most common surprise. Old water damage under a toilet, rotted plywood near an exterior door, termite damage that was hidden by carpet for twenty years. When we find it, we stop, document it with photos, call you to explain the situation, and provide a cost estimate for the repair. We do not proceed until you approve the additional work. Minor repairs (a few squeaky screws, a small patch of leveling compound) are typically included at no extra charge. Major structural repairs are quoted separately.
Material defects. Occasionally a box of flooring will contain planks with manufacturing defects — chipped edges, inconsistent color, damaged click-lock profiles. Our installers inspect every plank before it goes down and set aside any defective pieces. We always order 10 percent extra material to account for cuts and waste, which usually covers defects too. If the defect rate is unusually high, Sarah contacts the distributor for replacement material, which may add a day or two to the schedule.
Moisture issues. High moisture readings in the subfloor or concrete slab can halt an installation. Installing wood or laminate over a wet subfloor leads to cupping, buckling, and mold. If moisture levels are too high, we may need to apply a moisture barrier, install a vapor retarder, or in severe cases, wait until the source of the moisture is identified and addressed. This is frustrating when it delays your project, but it prevents catastrophic failure down the road. Our basement flooring guide covers moisture concerns in detail for below-grade installations.
Material shortage. Despite careful measurement and our standard 10 percent overage, complex layouts with lots of cuts can sometimes use more material than estimated. If we run short, Sarah contacts the supplier immediately to get additional material — ideally from the same production lot to ensure color consistency. This might add a day to the project while we wait for delivery.
Weather delays. This mostly affects material delivery and our ability to work with adhesives and finishes. Extreme cold can slow adhesive curing. High humidity can prevent site-applied finishes from drying properly. If weather is going to impact quality, we delay rather than push through and risk a subpar result.
Unexpected layout complications. Walls that are not square, rooms that are not rectangular, floor joists that run in an unexpected direction — these things add time to the installation but are part of working in real homes that were not built in a factory. Our crews have the experience to adapt, but it means the timeline may shift by a few hours or half a day.
Every project has a single point of contact on our side. Sarah Mitchell coordinates everything — from the initial scheduling through the final walkthrough. If there is a delay, she calls you. If there is an unexpected cost, she explains it before any work happens. If you have a question at 9 PM about something you noticed on your new floor, you can reach our team and get a real answer. We do not disappear after the last plank goes down.
How we prevent problems in the first place. Most of the issues above are caught during our pre-install process. The detailed measurement visit, the subfloor assessment notes, the material ordering with built-in overage, the acclimation protocols — all of these exist because Vincent Karaca built this company on the principle that prevention is cheaper than repair. We have been doing this since2003 with a team of 35+ professionals who follow the same processes on every job. The systems work.
Frequently Asked Questions
How long does flooring installation take?
It depends on the material, the square footage, and the condition of your subfloor. A single room with luxury vinyl plank might take one day. A whole-house hardwood install can run five to ten days. Tile is the slowest because of mortar and grout curing times — a large kitchen or bathroom can take three to five days on its own. Carpet is the fastest, with most rooms done in a few hours. We always give a timeline range at your pre-install meeting and update you if anything changes once we get into the work.
Can I walk on new floors right away?
It depends on what was installed. Floating floors like luxury vinyl plank and most laminates can be walked on immediately with clean socks or soft-soled shoes. Nail-down or glue-down hardwood typically needs 24 hours before light foot traffic. Tile floors need 24 to 48 hours for the mortar to set before you walk on them, and you should wait another 24 hours after grouting. If your hardwood was finished on site with polyurethane, stay off it for at least 24 to 48 hours depending on the product. We will give you exact instructions at your final walkthrough.
When can I move furniture back after flooring installation?
For floating floors like LVP and laminate, you can start moving furniture back 24 hours after installation. For glue-down hardwood, wait at least 48 to 72 hours to let the adhesive fully cure. For tile, wait a minimum of 48 hours after grouting. Site-finished hardwood with polyurethane needs the longest wait — typically 72 hours to a full week depending on the finish and the number of coats. Always use felt pads under furniture legs and never drag anything across a new floor. Lift and place.
Do flooring installers move furniture?
We can, but it is best if you handle it before we arrive. Our crew is there to install flooring, and moving furniture adds labor hours to your project cost. If you need us to move heavy pieces like a piano or a large china cabinet, let our operations team know when you schedule the install so we can plan for it. Small items, lamps, and loose belongings should always be cleared out by the homeowner before day one. The more you can do ahead of time, the faster we get your new floors down.
What happens if installers find subfloor damage?
We deal with this more often than you might think. Our crew inspects the subfloor as soon as the old flooring comes up. Minor squeaks can usually be fixed with screws on the spot. Soft spots, water damage, or rot require replacing sections of subfloor plywood before we can proceed. We will call you immediately if we find anything significant, explain the issue, give you a cost for the repair, and get your approval before doing any additional work. We never cover up a bad subfloor — that leads to bigger problems later.
How should I prepare for flooring installation day?
Clear all furniture and belongings from the rooms getting new flooring. Empty closets if the flooring extends into them. Remove wall decorations and fragile items from adjacent walls. Make sure your flooring material has been acclimating in the home for the required time — usually 48 hours for LVP and engineered hardwood, three to five days for solid hardwood. Keep your HVAC running at normal living temperature. Arrange for pets and small children to be elsewhere. And make sure our crew has clear access to a door, a driveway for the trailer, and a power outlet.
About the Author
Operations Manager
Sarah keeps the trains running. She joined the company in 2016 after a decade managing logistics for a regional building materials distributor. She coordinates every project from initial estimate thro...
You Might Also Like
How to Prepare Your Home for Flooring Installation
Every week we show up to a home where the living room is still full of furniture and the dog is loose. Here's everything...
Read: How to Prepare Your Home for Flooring In… Cost GuideWhy Your Flooring Quote Varies: What Goes Into Pricing
You called three companies and got three wildly different numbers. Before you pick the cheapest one, let us show you wha...
Read: Why Your Flooring Quote Varies: What Goe… Cost GuideHow Much Does Flooring Installation Cost in 2026? Complete Price Guide
Tired of vague price ranges from sites that have never swung a hammer? Here are real, local flooring costs pulled from p...
Read: How Much Does Flooring Installation Cost…